Sunday, May 5, 2019

Quiche with spinach / ほうれん草のキッシュ


Quiche is one of our favorite dishes for Sunday.
The smell of onion and cheese from the oven fills the kitchen...it is a happy moment. 

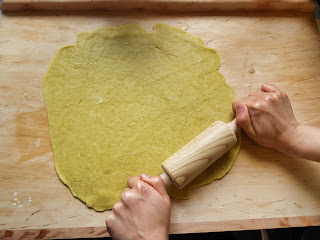
Usually, I use a prepared pie sheet from the supermarket, but today, I tried to make the pie also by myself. And it worked very well!


Here is the recipe.
For the pie, I referred to the recipe developed by Moto https://cookpad.com/recipe/1465111


Ingredients for 4 people (30 cm round form)

Pie 
- 220 g of flour
- 60 g of milk
- 60 g of olive oil 
- 1 small spoon of salt

Filling
- 2 onion
- 150 g of spinach
- 50 - 100 g of bacon 
- 3 eggs
- 1 piece of garlic
- 1 glass of milk
- 100 g of cheese
- 1 large spoon of white wine
- Some salt and pepper
- Some olive oil


Procedure

1. Put all ingredients of the pie into the bowl, knead the dough until the surface of the dough gets smooth. Roll out the dough and put into the round form. Rest the dough in the fridge.
2. Heat the oven at 200 °C.
3. Cut the onion and bacon into small pieces. Cut the garlic finely. Slice the cheese.
4. Heat the pan, put some olive oil, and fry the bacon for 1 min. Add the onion, some salt and pepper, and fry them at a middle temperature for 5 min. Add the spinach, garlic and white wine, and and fry at a middle temperature for 2 or 3 min until the spinach gets soft. 
5. Put the eggs into a bowl,  add milk and mix them. 
6. Put bacon and vegetables on the pie, pour the egg-milk mixture, and put the cheese. 
7. Put the quiche into the oven and bake for 25 - 30 min.
8. Take the quiche from the oven, cut into four piece and serve on the dish.


**********************************

キッシュは我が家の日曜日ランチの定番です。
オーブンからたまねぎとチーズの香りが漂うキッチンは、至福のひととき。

いつもはスーパーでパイ生地を買うのですが、今回は生地も手作りしてみました。
とてもおいしくできました!
生地のレシピは、モトさんが紹介してくださったものを参考にしております。 https://cookpad.com/recipe/1465111


材料(4人分、30センチ円型)

パイ生地
・小麦粉 220g
・牛乳 60g
・オリーブオイル 60g
・塩 小さじ1

・たまねぎ 2個
・ほうれん草 150g
・ベーコン 50~100g
・にんにく 1片
・牛乳 1グラス
・チーズ 100g
・白ワイン 大さじ1
・塩コショウ少々
・オリーブオイル少々


作り方

1.パイ生地の材料全てをボールに入れ、表面が滑らかになるまでこねる。麺棒で伸ばし、型にかぶせる。冷蔵庫で寝かせる。
2.オーブンを200度に予熱する。
3.ベーコン、玉ねぎ、にんにくをみじん切りにする。チーズをスライスする。
4.フライパンにオリーブオイルをひき、ベーコンを1分ほど炒める。玉ねぎと塩コショウ少々を加え、中火で5分炒める。ほうれん草と白ワインを加え、ほうれん草がしんなりするまで、2、3分炒める。
5.卵と牛乳をボールにいれ、かき混ぜる。
6.パイ生地の上にベーコンと野菜を乗せ、卵・牛乳液を注ぎ、チーズを乗せる。
7.オーブンで25分~30分焼く。
8.4等分し、お皿に盛り付ける。


Bon appétit!

Azu


Saturday, May 4, 2019

Linguine with calf liver / 子牛レバーのリングイネ


If you need more stamina, I recommend to cook something with liver because liver contains a lot of iron.
If you do not like the unique smell of liver, you can reduce the smell by putting raw liver into milk for 15 min before cooking.

Today I made a linguine with calf liver.
I added some parsley to eliminate the smell more intensively.
I personally think that liver goes very well with a sweet source.
That's why I added some sugar in the source.

Here we go!


Ingredients for 2 person

- 150 g calf liver
- 2 or 3 shallot
- 1 bundle of parsley 
- 1 garlic 
- 1 glass of red wine 
- 1 glass of water with beef stock powder
- 1 small spoon of sugar
- 1/2 small spoon of salt (please adjust)
- 1 large spoon of Parmesan cheese 
- Some black pepper
- Some olive oil
- Some herbe 

Procedure

1. Cat the calf liver into small pieces (1.5 cm cube). Cut the shallot into small pieces. Chop the parsley finely. Grate the garlic. 
2. Boil the water for the linguine.
3. Heat the pan, put some olive oil and fry the liver. If the liver turned brown, add the shallot, salt and pepper and keep frying at a middle heat for 5 min.
4. Put the red wine, water with beef stock powder, sugar, herbe, and grated garlic into the pan. Cover the pan and cook the source at a low heat for 10 - 15 min. If there is not enough water, please add some boiled water of the linguine.
5. While the source is cooked, boil the linguine.
6. Put the cooked linguine into the source. Add some olive oil (up to 1 large spoon) and Parmesan cheese. Adjust the taste with some salt.
7. Serve in the dish.


****************************************

スタミナが必要!
そんな日は鉄分豊富なレバーに限りますね。
レバー独特の臭みは、レバーを牛乳に15分浸す下処理をすると改善されます。

今日は子牛レバーのリングイネ(平らなスパゲッティ)を作ってみました。
臭み消しのために、イタリアンパセリを入れてみました。
レバーは甘めの味付けが合うので、砂糖も少し加えました。

それでは今日のレシピをどうぞ!


材料2人分

・レバー 150g
・エシャロット 2,3個
・イタリアンパセリ 1束
・にんにく 1片
・赤ワイン 1グラス
・コンソメ(できればビーフ)スープ 1グラス
・砂糖 小さじ1
・塩 小さじ1分の2(お好みで調節してください)
・パルメザンチーズ 大さじ1
・黒こしょう 少々
・お好きなハーブ 少々
・オリーブオイル 適量

作り方

1.レバーを小さめ(1.5センチ辺くらい)に切る。エシャロットとパセリをみじん切りにする。にんにくはすりおろす。
2.リングイネをゆでるために、なべにお湯をわかす。
3.フライパンを熱し、オリーブオイルをひき、レバーをいためる。火が通ったら、エシャロット、塩、こしょうを加え、中火で5分ほどいためる。
4.3に赤ワイン、コンソメスープ、砂糖、にんにくを加える。ふたをし、弱火で10~15分ほど煮る。
5.その間にパスタをゆでる。
6. パスタをソースに入れ、オリーブオイル少々(大さじ1まで)とパルメザンチーズを加えてあえる。塩で味を調える。
7.盛り付けて完成


Bon appétit!

Azu

Friday, May 3, 2019

Nikuman (meat bun) / 肉まん


Making the bun at home sounds somehow complicated but it is actually not 😉
The nikuman is absolutely my favorite that remembers me my childhood.
You can find the nikuman almost everywhere in Japan. Especially, convenience stores have their original buns with different kinds of fillings.
Since I came to Germany, I could not find any nikuman in my surroundings. So I decided to make it at home and I was quite surprise that the home-made nikuman is so fresh and juicy, and not so complicated!
With this recipe, I have never made a failure.

*************************************
肉まんって家で作るの難しそう・・・そう思っていませんか?
実はそんなに難しくないんですよ。手順さえきちんと踏めば、ちゃんとできます。
小さい頃から大好きだった肉まん。
ドイツに来てから周囲に肉まんのない生活になってしまいました。(涙)
そこで、家で作ってみよう!と思いやってみたら、思いの外簡単で、しかも新鮮でとてもおいしいではありませんか!
それ以来、家で良く作っています。

今日のレシピは、nattsu47さんがクックパッドで紹介してくださったレシピを、そのまま使用しております。
https://cookpad.com/recipe/2133804

(日本語が分かる皆様は、上記のリンクをそのままご参照ください。以下英語に翻訳しております。)

*************************************

This receipt is developed by nattsu47-san.
https://cookpad.com/recipe/2133804

Please note that the ingredients are all same as the original but I made some changes in the text.


Ingredients for 8 pieces

Bun
- 50 g of strong flour 
- 150 g of flour
- 1/2 large spoon (5 g) of baking powder
- 1/2 large spoon (5 g) of  dried yeast 
- 30 g of sugar  
- 1/2 large spoon (6 g) of sunflower oil
- Some salt

Meat filling
- 150 g of minced pork 
- 1/2 of onion
- 1.5 large spoon of bread crumb ("panko")
- 1/2 large spoon of chicken stock powder 
- 1 large spoon of soy source
- 1/2 large spoon of sugar 
- 1/2 large spoon of sesame oil
- 1/2 large spoon of starch 

Procedure

1. Put all ingredients of the bun in a bowl and add 100 ml of the lukewarm water.
2. Knead the dough until it becomes smooth (for about 5 to 7 min). 
3. Put the dough in the bowl and wrap it and leave for about 15 min.
4. Cut the onion in small pieces and mix with the bread crumb. 
5. Add all other ingredients of the meat filling and knead it.
6. Divide the meat filling into 8 balls.
7. Also, divide the dough into 8 balls. 
8. Roll out the dough ball and put the meat filling ball on it, and wrap the filling gently. Be careful that the bun is completely closed.
9. Heat the steamer (I used a rice cooker). Put the buns (I put them on the baking paper), and steam them for 20 min.
10. Serve the bun on the dish. 


I added small pieces of shiitake (a kind of mushrooms) in the dough to add some more flavor.
You can eat the bun with some soy source & vinegar dressing (soy source : vinegar = 1:1).

オリジナルレシピには入っていませんでしたが、しいたけを入れてみました。
ソースは味ポンでもいいですし、しょうゆとお酢を1対1で混ぜたものでもおいしいです。


Flower carrot for decoration
花形にんじん


Dried shiitake
乾燥しいたけ。日本の乾物大好き(笑)


Dough after kneading
こねた後の生地


Dough got some rest 
寝かせた後の生地


Shiitake soaked hot water, the shiitake water was used for making a soup
しいたけの煮汁はスープに活用


Round meat filling
肉まんの中身


Wrap carefully and beautifully
繊細にきれいに包む


Ready for steam!
蒸し器に投入準備オッケー!


Rice cooker is doing a good job...
あんまり日本で見かけないかもしれませんが、炊飯器に金属のプレートをセットして蒸す機能がついています。


Bon appétit!

Azu

Thursday, May 2, 2019

How to maximize the taste of the sesame? / どうやってごまの味を引き出すか

I personally like the sesame very much.
I often use this for salad, teriyaki source and paste, to add some accent in the dishes.

If you want to maximize the flavor of the sesame, I recommend to roast it on the pan.
It is a very simple and quick process but it makes a huge difference.

**************************

ごまがとっても好きです。
サラダに入れたり、照り焼きソースにふりかけたり、ごま和えを作ったり、使い方は色々ですよね。

ごまの味を最大限に引き出すには、フライパンでさっとローストすると良いですよ。
この一手間が大きな違いを生みます!


Here is the recipe of the daikon carrot salad with the sesame and lemon.

Ingredients for 2 people

- 1/4 daikon 
- 1 carrot
- 10 g of sesame
- 1.5 large spoon of olive oil
- 1 spoon of fresh pressed lemon source
- 1/2 small spoon of salt
- 1 small spoon of brown sugar (or normal sugar)
- Some grating lemon skin

Procedure

1. Peel the skin of the daikon and carrot and grate them in a bowl. 
2. Roast the sesame. 
3. Mix the seasonings and make a dressing.
4. Put the sesame and the dressing in 1.

**************************************

ごま大活躍の大根とにんじんのなますのレシピです。

材料 (2人分)

・大根 4分の1
・にんじん 1本
・ごま 10 g
・オリーブオイル 大さじ1.5
・レモン汁 大さじ1
・塩 小さじ2分の1
・黒砂糖(または普通の砂糖) 小さじ1
・レモンの皮少々

作り方

1.大根とにんじんの皮をむき、すりおろす。
2.ごまをローストする。
3.調味料を混ぜ合わせ、ドレッシングを作る。
4.ごまとドレッシングを1に和える。


Bon appétit!

Azu

Chicken wing with apple teriyaki source/ 手羽先のりんご照り焼きソース


Do you know that apple makes a very sweet tasteful source?
Today, I improvised a teriyaki source with apple.
Apple helps a lot to eliminate the smell of meat and softens the meat as well.

Here is the recipe which I developed.

Ingredients for 2 - 3 persons

- 10 chicken wings
- 1/2 apple
- 1 small piece (about 5 g) of ginger 
- 1 small piece of garlic
- 3 large spoon of soy source
- 4 large spoon of white wine or better sake (Japanese rice wine)
- 1 large spoon of honey 
- Some olive oil

Procedure

1. Grate apple, ginger and garlic and mix them with all seasonings in a bowl. 
2. Put chicken wings in the source and leave them for about 1 h or more.
3. Heat the pan, put some olive oil and put chicken wings with the source. Cover the pan and keep cooking for 20 min at a low to middle heat. Turn the chicken wings every 5 mins so that they will be cooked well. If there is less source, add some water so that it will not get burned. 
4. Increase the heat so that the source will be caramelized and the skin of the chicken wings will be grilled a little bit. 
5. Serve the chicken wings in the dish.

Easy, isn't it? 😉


I served the chicken with:
- Daikon carrot salad
- Yu-dofu (tofu soup)
- Rice

************************************

りんごで甘くて濃厚なソースが作れることをご存知でしょうか?
今日はすりおろしりんごを使って、照り焼きソースを作ってみました。
りんごはお肉の臭みを消してくれ、さらにお肉を柔らかくしてくれます。

では、オリジナルレシピをどうぞ!

材料(2、3人分)

・手羽先 10個
・りんご 2分の1
・しょうゆ 大さじ3
・酒 大さじ4
・はちみつ 大さじ1
・しょうが 1片(5gほど)
・にんにく 1片

作り方

1.りんご、しょうが、にんにくをすりおろし、調味料を加える。
2.手羽先を入れ、1時間以上置く。
3.なべに油をひき、手羽先とソースを入れる。ふたをして、弱~中火で20分蒸し焼きにする。途中水分がなくなってきたら、水を足す。
4.火を少し強め、照り焼きにし、肉の表面に少し焼きをつける。
5.お皿に盛り付ける。

とっても簡単にできますよ!

一緒に作った品は以下のとおり。
・大根とにんじんのなます
・湯豆腐
・ご飯


Bon appétit!

Azu

Wednesday, May 1, 2019

Fresh tomato chili con carne / フレッシュトマトのチリコンカン


This receipt was actually improvised by my husband's failure: he forgot to buy a canned tomato which was indeed necessary for the chili con carne.

Solution: why don't we make some tomato juice from fresh tomatoes?!
And result: wow, it's actually much better than usual!  😤💗

So today, I would like to share my original chili con carne recipe.


Ingredients:

- 300 g of minced beef
- 2 onions
- 1/2 zucchini
- 1 red paprika
- 1 carrot
- 250 g of tomato
- 250 g of cooked kidney bean
- 200 g of cooked chick bean
- 2 glasses of water with beef stock powder
- 2 glasses (about 1/4 bottle) of red wine
- 1 large spoon of paprika powder
- 1/2 small spoon of cayenne pepper
- 1/2 small spoon of salt (please adjust depends on the taste)
- 2 bay leaves
- Some olive oil
- Some dried chili
- Some black pepper
- Some thyme (or other harb)

Procedure:

1. Cut the vegetables into small pieces. There is no rule how to cut but they should be small.
2. Put fresh tomatoes in a mixer or juicer to make a tomato juice.
3. Heat the pan, put some olive oil, and put the minced beef and fry it at a high heat. Add the vegetables prepared in the 1 and salt and fry them at a middle heat for 5 - 10 min, until they will be cooked.
4. Add the beans into 3. If you use canned beans, I recommend to put the bean juice as well.
5. Add water with beef stock powder, red wine, and all seasonings and cover the pan. Cook for 30 to 40 min at a low heat. If there is not enough moisture, add some water. 
6. Serve in the dish. I recommend you to serve with some rice, fresh tomatoes and avocado. You can also add some chili source or granting cheese.

*********************************

今日のレシピは、夫のある失敗から発明されました。
チリコンカンを作るにはどうしてもトマト缶が必要なのですが、夫がトマト缶を買い忘れてしまったのです。
どうしよう…と迷った挙句見つけた解決策は、「じゃあ生のトマトで作ってみる?」
そしてその結果、「…あれ?いつもよりも格段に美味しいぞ!(笑)」

というわけで、今日はフレッシュトマトを使ったオリジナルチリコンカンレシピです。


材料

・ひき肉 300 g 
・たまねぎ 2 個
・ズッキーニ 2分の1本
・赤パプリカ 1個
・にんじん 1本 
・トマト 250 g 
・煮てあるインゲン豆(キドニービーン)250 g
・煮てあるヒヨコ豆 200
・コンソメスープ 2カップ
・赤ワイン 2カップ(4分の1本)
・粉末パプリカ 大さじ1
・カイエンペッパー 小さじ2分の1
・塩 小さじ2分の1(お好みで調節してください)
・ローリエ 2枚
・オリーブオイル 適量
・乾燥唐辛子(鷹の爪)適量
・こしょう 適量
・タイム (お好きなハーブでも可) 適量


作り方

1.野菜を細かく切る。切り方は自由だけど、小さくなるように。
2.トマトをミキサーにかけ、ジュースにする。
3.なべを温め油をひき、強火でひき肉をいためる。野菜を加え、塩をふり、しんなりするまで中火で5~10分いためる。
4.3に豆を加える。もし缶の豆を使うときは、缶に入っている汁を入れても良い。
5.4にコンソメ、赤ワイン、その他の調味料全てを加える。弱火で30分から40分煮込む。もし水分がなくなってきたときは、水を足す。
6.お皿に盛り付ける。ご飯とトマト、アボカドと一緒に食べるとよりおいしい。タバスコやすり下ろしたチーズを加えても美味。


Bon appétit!

Azu


Spagetti with anchovy & spring onion / アンチョビとねぎのスパゲッティ


Anchovy is helpful to make your pasta more taste-intensive because it makes a good stock. 
Also, it suits very well with the sour tast of the tomatoes. 
Very important thing is that you add the anchovy after the pasta is cooked! 
If you put the anchovy in the source at a very early stage and cook it for a long time, the nice fishy flavor will disappear. 

Also, I made a salad with the vegetables which are actually the leftover of the spring roll. 
I added a half of apple and some sunflower seeds, in order to make some changes from the leftover.

*****************************************

アンチョビは良い出汁が出るので、パスタの味わいをより一層深めるために使えます。
さらに、トマトの酸味と良く合います。
大事なのは、アンチョビはパスタがゆで終わってから入れること!
もし最初の段階でソースに加え、長い間調理してしまうと、せっかくの香りが飛んでいってしまいます。

それから、先日の春巻きで使った葉っぱたちで、サラダを作りました。
味に変化を持たせるため、リンゴ半分とひまわりの種を加えました。


Bon appétit!

Azu

Tuesday, April 30, 2019

Salmon teriyaki & Japanese omelette (dashimaki-tamago) / 鮭の照り焼きとだし巻きたまご


Today's dinner is the traditional Japanese :)
It is very common in Japan to have several kinds of dishes at dinner.
The portion of each dish is small so that everything can fit in the stomach.
Today, I made following dishes.

- Salmon teriyaki
- Dashimaki-tamago (Japanese omelette)
- Crumble silken tofu with beans
- Miso soup with carrot and radish
- Rice

This traditional meal style is called "ichi-ju san-sai (一汁三菜)" and it means "one soup and three side dishes".
Many people in Japan put high importance to take various nutrition from various ingredients because it is healthy.
Thus, the traditional Japanese meal is ideal for them but at the same time, it requires a lot of time and effort to make many dishes at the same time.
I spent about 1 h to cook all dishes today. It depends on person whether 1 h is long or short ;)
As cooking is for me a relaxing time that can clearly separate work and private life, I personally love to stand in the kitchen and it usually does not bother to spend quite a lot of time there :)

I would like to introduce you the recipe of dashimaki-tamago because it is really delicious.


For 2 persons

Ingredients: 

- 3 eggs
- 3 large spoon of water
- 1 large spoon of soy source
- 1 to 1.5 large spoon of sugar (please adjust as you like)
- Some oil

Procedure:

1. Break the eggs into a bowl. Add water and all seasonings and mix them lightly so that the eggs can intake some air.

2. Heat the pan, put some oil, and put 1 and cover the pan at a low to medium heat until the surface of the eggs becomes gently solid. 

3. Cut and serve. You can add some grating radishes (better to use the Japanese radish "daikon") to add some freshness.


Tell me how you like it if you try it ;)


*********************************************

今日は日本食です。
献立は以下のとおり。

・鮭の照り焼き
・だし巻きたまご
・いんげんの白和え
・にんじんとラディッシュの味噌汁
・ご飯

一汁三菜というように、和食はたくさんの品数を作りますよね。
色んなものから栄養を摂ることが出来るので、和食はまさに理想の食事。
しかし、一方で品数が多いので作るのが大変という面もあります。
今日は全部作るのに小一時間かかりました。
私にとって料理は、仕事と生活をきっぱり分けてくれるリラックスタイムなので、キッチンに長いこといることは苦ではないんです。むしろ癒し♪

今日はだし巻きたまごのレシピをご紹介します。

2人分

材料
・たまご 3個
・水 大さじ3
・しょうゆ 大さじ1
・砂糖 大さじ 1~1.5(お好みで調節してください)

作り方
1.たまごをボールに割りいれ、水と調味料を入れて、空気を取り込むようにふわふわと混ぜる。
2.フライパンを熱し、油をひき、1を流しいれる。ふたをして小~中火でたまごの表面が固まるまで焼く。
3.切ってお皿に盛り付ける。お好みで大根おろしを加えると、さわやかさが増してグッドです。

ぜひ作ってみてくださいね。


Bon appétit!

Azu

Monday, April 29, 2019

Spring roll with mints / ミント香る春巻き

After having worked hard, there is a yummy reward :)
Puff rice cracker with peanuts butter and berries.

*******************************

仕事頑張った後のご褒美♪
ライスクラッカー(ポン菓子みたいな食感で味がついていないクラッカー)にピーナッツバターをぬって、ベリーを添えて。


In such a rainy day, I need something fresh and cheerful...why don't have some mints?
This spring roll contains a lot of vegetables; onions, zucchini, kohlrabi, paprika...anything left in the fridge. 
I roll it in a large salad leaf with a couple of mints and sweet chili source.

*********************************************

こんな雨の日には何かさっぱりして元気が出るものが食べたい…ミントなんてどうかしら?
この春巻きは野菜たっぷり。玉ねぎ、ズッキーニ、コールラビ(カブの一種)、パプリカ…冷蔵庫に残っている野菜を入れて。
大きな葉っぱに少しのミントとスイートソースと一緒に巻いて、どうぞ。


Bon appétit!
Azu

Sunday, April 28, 2019

Spagetti with green asparagus, salad with cherry tomatoes / 緑アスパラのスパゲッティとチェリートマトのサラダ

It was so cold today that I cannot believe that this is actually end of April.
The fresh green asparagus brings a nice feeling of spring though. 
I put also some shallots to intense the flavor.  

**********************************

今日は4月末とは思えないほど寒い日でした。
でも新鮮な緑アスパラが春の雰囲気を運んできてくれました。
エシャロットを加えることで、より味に深みが出ます。


I usually eat pasta with a salad.
Today, I served the cherry tomatoes with basil. 
Perhaps it is one of the most simple and delicious one if you have a luck with the quality of tomatoes ;)
The dressing is also home made: balsamic and soy source with some olive oil.
The balsamic goes wonderfully with the sour tast of the tomatoes and the soy source balances them even better. Please try.

Olive oil : balsamic : soy source = 1.5 : 1 : 0.3

**********************************

我が家ではパスタの日にはたいていサラダがつきます。
今日はチェリートマト(茎についた状態で売っているミニトマトの一種)とバジルのサラダを用意。
おそらく一番簡単だけど一番おいしい...もし良いトマトに出会えたのならば☆
ドレッシングは手作りです。バルサミコ、しょうゆ、オリーブオイルを使っています。
バルサミコがトマトの酸味と絶妙にマッチし、さらにしょうゆがその2つのバランスをもっと引き出してくれる感じでしょうか。
ぜひ作ってみてください。

オリーブオイル : バルサミコ酢: しょうゆ= 1.5 : 1 : 0.3

の配合です(だいたい)。


Bon appétit!
いただきます!

Azu

Saturday, April 27, 2019

Home made granola / 手作りグラノーラ


Granola is one of the most common breakfast in Germany.
It is called "Müsli" and you can purchase many kinds of granola in supermarkets; some are with chocolate, others are with dry fruits.
What about making an original granola at home with your favorite ingredients!?

It is very simple: you just mix the ingredients, with some seasoning and flavors, and backe it in the oven about 10 - 15 min. 
Today, I used following ingredients.
Base: oatmeal
Additional ingredients: sunflower seed, linseed, almond, chia seed
Seasoning: a pinch of salt, honey, cinnamon, coconuts oil

This was inspired by a You Tube video of Sanne Vloet

I put this granola on the almond & soybeans yogurt with some coconuts chips and goji berries.
Crunchy and yummy... :)
Try with your favorite nuts, seeds, and flavors!

****************************

グラノーラはドイツでもっともポピュラーな朝食の一つです。
ミューズリと呼ばれ、スーパーには色んな種類のものが売っています。チョコレート味とかドライフルーツが入ったものとか。
このグラノーラ、実は、自分の好きな材料で家で簡単に作れちゃうんです。

レシピはとてもシンプル。材料を混ぜ、味付けし、 オーブンで10分から15分焼くだけ!
今日は以下の材料で作ってみました。
ベース:オートミール
その他の材料:ひまわりの種、亜麻仁、アーモンド、チアシード
味付け:塩ひとつまみ、はちみつ、シナモン、ココナッツオイル

このレシピはSanne VloetさんのYou Tubeを参考にしました。

アーモンドヨーグルトにココナッツチップとクコの実を添えて…さくさくでとってもおいしい!
みなさんの好きなナッツや種、香りで作ってみてくださいね。


Bon appétit!
いただきます!

Azu